Playing with images has fascinated everyone from professional photographers to a noob.
Now I will share some of the stuff I know in creating a photographic mosaic images using software called Andrea Mosaic (thanks to the developer)
Features of Andrea Mosaic:
1. Flexible options
2. Great UI
3. Ease of use
4. Its free
Download it from here.
Now I will explain you to create a basic photographic mosaic in few easy steps…
Step 1:
Download and install the software from the above link provided.
Step 2:
Open Andrea Mosaic and the application window.
Every option is self explanatory when you move your cursor over it and wait like shown below.

Now pass your cursor on to everything to view detail of each of the options.
Step 3:
Time for some fun!!!
Now you have to select the tiles (small images used to make the big one) Click the “select tile” option button and it opens a tile select window, in that click the add folder window and select the folder containing images for your tiles...

And then,

And now add the folder containing the images(the smaller ones to incorporate into the bigger one).
Step 4:
Save the tile by clicking the “save archive” button, now your tile will be saved by default name or any name you choose. Saving the archive is similar to saving a playlist for media players.
Step 5:
Now add the original image to be processed by clicking the “+” symbol button at the top of the window space. After adding, the image appears in the workspace provided with some grid lines as shown below…

Step 6:
You are almost done!!
Now, you can customize the image appearance..
Set Size parameters and tile duplication options (options are self explanatory when cursor is moved over).
Here “tile size” determines how many tiles to fit in to the image... Don’t worry if you have less amount of tile images, you can select the duplicate option to duplicate and fit the tiles to the size which you specify.
Under “color change” option, you can set the percentage of the color to which the tile should change with respect to the image to be processed (i.e.), The more percentage you set, the more the tiles are converted to the color of the image to be processed, The less percentage you set, the more the originality of the tile is kept.
The tradeoff between low and high percentage is the tile clarity and the final image mosaic clarity respectively.
The tile variants option lets you modify the alignment and orientation of the tiles within the image to be processed.
Finally, the “mosaic information” lists the information and customization of the work ready to be processed.
Step 7:
Now click the “more options” button to open the extra options to adjust image quality, output file format, save locations, setting borders etcetera. You can modify any setting or simply leave it to the default setting.
Step 8:
Now click the create mosaic option and wait….
Blimey!!!!! The image is ready…

This image is set with A4 mosaic size with 10000 tiles and a color change of 70%
Note: 1. To process a image with the same tile, create at least 30 duplicates of the tile in a folder and save it as an archive.
2. Use only JPEG images
Comments are welcome....
[Credits to the developer of the software]
Now I will share some of the stuff I know in creating a photographic mosaic images using software called Andrea Mosaic (thanks to the developer)
Features of Andrea Mosaic:
1. Flexible options
2. Great UI
3. Ease of use
4. Its free
Download it from here.
Now I will explain you to create a basic photographic mosaic in few easy steps…
Step 1:
Download and install the software from the above link provided.
Step 2:
Open Andrea Mosaic and the application window.
Every option is self explanatory when you move your cursor over it and wait like shown below.

Now pass your cursor on to everything to view detail of each of the options.
Step 3:
Time for some fun!!!
Now you have to select the tiles (small images used to make the big one) Click the “select tile” option button and it opens a tile select window, in that click the add folder window and select the folder containing images for your tiles...

And then,

And now add the folder containing the images(the smaller ones to incorporate into the bigger one).
Step 4:
Save the tile by clicking the “save archive” button, now your tile will be saved by default name or any name you choose. Saving the archive is similar to saving a playlist for media players.
Step 5:
Now add the original image to be processed by clicking the “+” symbol button at the top of the window space. After adding, the image appears in the workspace provided with some grid lines as shown below…

Step 6:
You are almost done!!
Now, you can customize the image appearance..
Set Size parameters and tile duplication options (options are self explanatory when cursor is moved over).
Here “tile size” determines how many tiles to fit in to the image... Don’t worry if you have less amount of tile images, you can select the duplicate option to duplicate and fit the tiles to the size which you specify.
Under “color change” option, you can set the percentage of the color to which the tile should change with respect to the image to be processed (i.e.), The more percentage you set, the more the tiles are converted to the color of the image to be processed, The less percentage you set, the more the originality of the tile is kept.
The tradeoff between low and high percentage is the tile clarity and the final image mosaic clarity respectively.
The tile variants option lets you modify the alignment and orientation of the tiles within the image to be processed.
Finally, the “mosaic information” lists the information and customization of the work ready to be processed.
Step 7:
Now click the “more options” button to open the extra options to adjust image quality, output file format, save locations, setting borders etcetera. You can modify any setting or simply leave it to the default setting.
Step 8:
Now click the create mosaic option and wait….
Blimey!!!!! The image is ready…
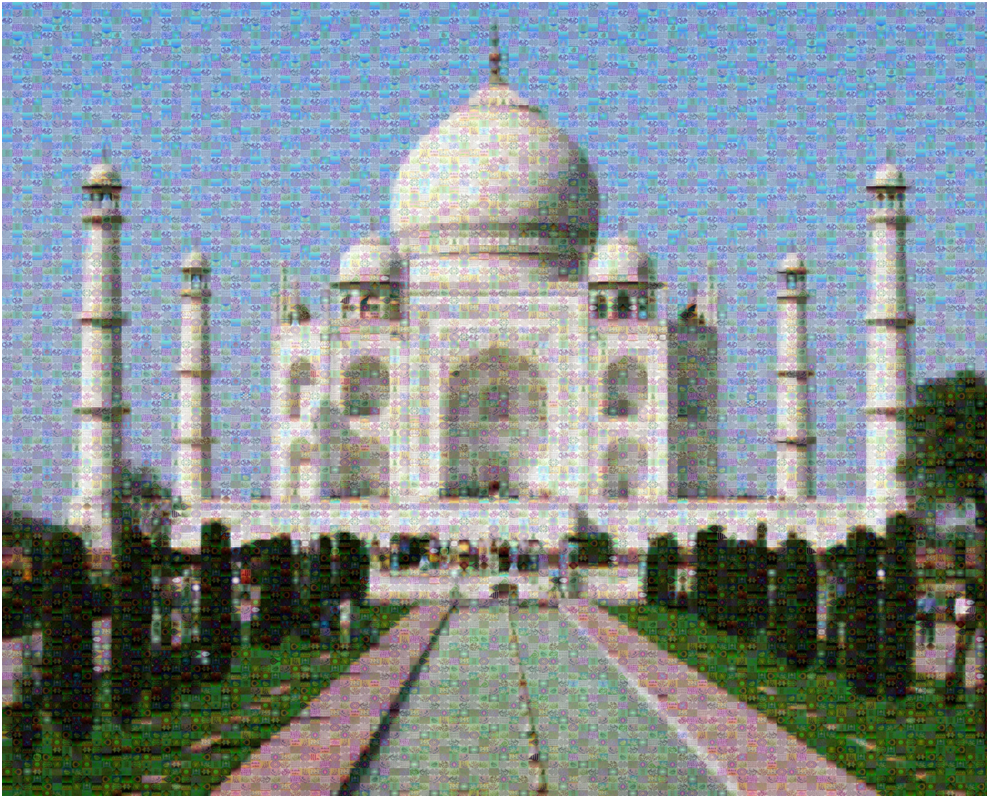
This image is set with A4 mosaic size with 10000 tiles and a color change of 70%
Note: 1. To process a image with the same tile, create at least 30 duplicates of the tile in a folder and save it as an archive.
2. Use only JPEG images
Comments are welcome....
[Credits to the developer of the software]
it's great.
ReplyDelete